Note
Access to this page requires authorization. You can try signing in or changing directories.
Access to this page requires authorization. You can try changing directories.
APPLIES TO: Developer | Basic | Basic v2 | Standard | Standard v2 | Premium | Premium v2
In API Management, you can expose a REST API managed in API Management as a remote Model Context Protocol (MCP) server by using its built-in AI gateway. Expose one or more of the API operations as tools that MCP clients can call by using the MCP protocol.
Azure API Management also supports secure integration with existing MCP-compatible servers - tool servers hosted outside of API Management. For more information, see Expose an existing MCP server.
Learn more about:
Limitations
- API Management currently supports MCP server tools, but it doesn't support MCP resources or prompts.
- API Management currently doesn't support MCP server capabilities in workspaces.
Prerequisites
If you don't already have an API Management instance, complete the following quickstart: Create an Azure API Management instance. The instance must be in one of the service tiers that supports MCP servers.
Make sure that your instance manages an HTTP-compatible API (any API imported as a REST API, including APIs imported from Azure resources) that you want to expose as an MCP server. To import a sample API, see Import and publish your first API.
Note
Other API types in API Management that aren't HTTP-compatible can't be exposed as MCP servers.
If you enable diagnostic logging through Application Insights or Azure Monitor at the global scope (all APIs) for your API Management service instance, set the Number of payload bytes to log setting for Frontend Response to 0. This setting prevents unintended logging of response bodies across all APIs and helps ensure proper functioning of MCP servers. To log payloads selectively for specific APIs, configure the setting individually at the API scope, allowing targeted control over response logging.
To test the MCP server, you can use Visual Studio Code with access to GitHub Copilot or tools such as MCP Inspector.
Expose API as an MCP server
Follow these steps to expose a managed REST API in API Management as an MCP server:
- In the Azure portal, go to your API Management instance.
- In the left menu, under APIs, select MCP Servers > + Create MCP server.
- Select Expose an API as an MCP server.
- In Backend MCP server:
- Select a managed API to expose as an MCP server.
- Select one or more API operations to expose as tools. You can select all operations or only specific operations.
Note
You can update the operations exposed as tools later in the Tools blade of your MCP server.
- In New MCP server:
- Enter a Name for the MCP server in API Management.
- Optionally, enter a Description for the MCP server.
- Select Create.

- The MCP server is created and the API operations are exposed as tools.
- The MCP server is listed in the MCP Servers blade. The Server URL column shows the endpoint of the MCP server to call for testing or within a client application.

Configure policies for the MCP server
Configure one or more API Management policies to help manage the MCP server. The policies apply to all API operations exposed as tools in the MCP server. Use these policies to control access, authentication, and other aspects of the tools.
Learn more about configuring policies:
- Policies in API Management
- Transform and protect your API
- Set and edit policies
- Secure access to MCP server
Caution
Don't access the response body by using the context.Response.Body variable within MCP server policies. Doing so triggers response buffering, which interferes with the streaming behavior required by MCP servers and might cause them to malfunction.
To configure policies for the MCP server, follow these steps:
In the Azure portal, go to your API Management instance.
In the left-hand menu, under APIs, select MCP Servers.
Select an MCP server from the list.
In the left menu, under MCP, select Policies.
In the policy editor, add or edit the policies you want to apply to the MCP server's tools. Define the policies in XML format.
For example, you can add a policy to limit calls to the MCP server's tools (in this example, one call per 60 seconds per MCP session).
<!-- Rate limit tool calls by Mcp-Session-Id header -->
<set-variable name="body" value="@(context.Request.Body.As<string>(preserveContent: true))" />
<choose>
    <when condition="@(
        Newtonsoft.Json.Linq.JObject.Parse((string)context.Variables["body"])["method"] != null
        && Newtonsoft.Json.Linq.JObject.Parse((string)context.Variables["body"])["method"].ToString() == "tools/call"
    )">
    <rate-limit-by-key
        calls="1"
        renewal-period="60"
        counter-key="@(
            context.Request.Headers.GetValueOrDefault("Mcp-Session-Id", "unknown")
        )" />
    </when>
</choose>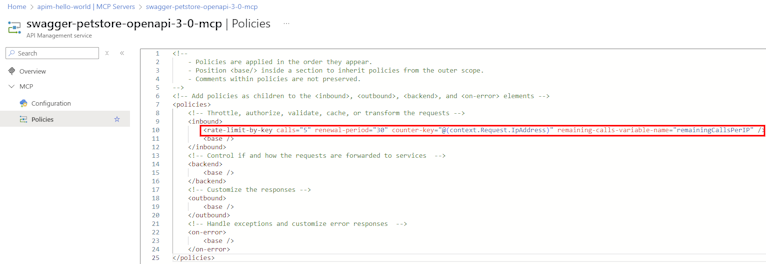

Note
API Management evaluates policies configured at the global (all APIs) scope before it evaluates policies at the MCP server scope.
Validate and use the MCP server
Use a compliant LLM agent (such as GitHub Copilot, Semantic Kernel, or Copilot Studio) or a test client (such as curl) to call the API Management-hosted MCP endpoint. Ensure that the request includes appropriate headers or tokens, and confirm successful routing and response from the MCP server.
Tip
If you use the MCP Inspector to test an MCP server managed by API Management, use version 0.9.0.
Add the MCP server in Visual Studio Code
In Visual Studio Code, use GitHub Copilot chat in agent mode to add the MCP server and use the tools. For background about MCP servers in Visual Studio Code, see Use MCP Servers in VS Code.
To add the MCP server in Visual Studio Code:
Use the MCP: Add Server command from the Command Palette.
When prompted, select the server type: HTTP (HTTP or Server Sent Events).
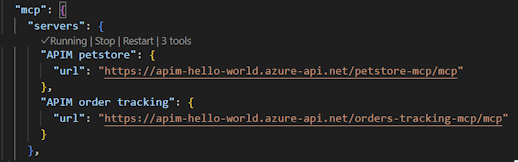
Enter the Server URL of the MCP server in API Management. For example,
https://<apim-service-name>.azure-api.net/<api-name>-mcp/mcpfor the MCP endpoint.Enter a Server ID of your choice.
Select whether to save the configuration to your workspace settings or user settings.
Workspace settings - The server configuration is saved to a
.vscode/mcp.jsonfile only available in the current workspace.User settings - The server configuration is added to your global
settings.jsonfile and is available in all workspaces. The configuration looks similar to the following:
Add fields to the JSON configuration for settings such as authentication header. The following example shows the configuration for an API Management subscription key passed in a header as in input value. Learn more about the configuration format

Use tools in agent mode
After adding an MCP server in Visual Studio Code, you can use tools in agent mode.
In GitHub Copilot chat, select Agent mode and select the Tools button to see available tools.

Select one or more tools from the MCP server to be available in the chat.

Enter a prompt in the chat to invoke the tool. For example, if you selected a tool to get information about an order, you can ask the agent about an order.
Get information for order 2Select Continue to see the results. The agent uses the tool to call the MCP server and returns the results in the chat.

Troubleshooting and known issues
| Problem | Cause | Solution |
|---|---|---|
401 Unauthorized error from backend |
Authorization header not forwarded | If necessary, use set-header policy to manually attach token |
| API call works in API Management but fails in agent | Incorrect base URL or missing token | Double-check security policies and endpoint |
| MCP server streaming fails when diagnostic logs are enabled | Logging of response body or accessing response body through policy interferes with MCP transport | Disable response body logging at the All APIs scope - see Prerequisites |