Note
Access to this page requires authorization. You can try signing in or changing directories.
Access to this page requires authorization. You can try changing directories.
To help you manage Azure resources, you can create automated tasks on specific supported resources or resource groups. These tasks vary in number and availability, based on the resource type.
For an Azure storage account, you can set up an automation task that sends the monthly cost for that storage account.
For an Azure virtual machine, you can create an automation task that turns on or turns off that virtual machine on a predefined schedule. Specifically, you can create a task that automatically starts or stops the virtual machine a specific number of times every day, week, or month. On the task's Configure tab, set the Interval value to the number of times and the Frequency value to Day, Week, or Month. The automation task continues to work until you delete or disable the task.
You can create an automation task from a specific automation task template. The following table lists the currently supported resource types and available task templates:
| Resource type | Automation task templates |
|---|---|
| All Azure resources | Send monthly cost for resource |
| Azure virtual machines | Additionally: - Power off Virtual Machine - Start Virtual Machine - Deallocate Virtual Machine |
| Azure storage accounts | Additionally: - Delete old blobs |
| Azure Cosmos DB | Additionally, - Send query result via email |
This article shows how to complete the following tasks:
- Create an automation task for a specific Azure resource.
- Review a task's history, which includes the run status, inputs, outputs, and other historical information.
- Edit the task so that you can update the task, or customize the task's underlying workflow in the workflow designer.
How do automation tasks differ from Azure Automation?
Automation tasks are more basic and lightweight than Azure Automation. Currently, you can create an automation task only at the Azure resource level. Behind the scenes, an automation task is actually a logic app resource that runs a workflow.
The logic app workflow is powered by the multitenant Azure Logic Apps service. After you create the automation task, you can view and edit the underlying workflow by opening the task in the workflow designer. After a task finishes at least one run, you can review the run's status, history, inputs, and outputs.
By comparison, Azure Automation is a cloud-based automation and configuration service that supports consistent management across your Azure and non-Azure environments. The service comprises process automation for orchestrating processes that uses runbooks, configuration management with change tracking and inventory, update management, shared capabilities, and heterogeneous features. Automation gives you complete control during deployment, operations, and decommissioning of workloads and resources.
Pricing
When you create an automation task, charges don't automatically start. Underneath, an automation task is powered by a workflow in a logic app resource hosted on multitenant Azure Logic Apps. So, the Consumption pricing model applies to automation tasks. Metering and billing are based on the trigger and action executions in the logic app workflow.
Executions are recorded and billed, regardless whether the workflow runs successfully or whether the workflow is even instantiated. For example, suppose your automation task uses a polling trigger that regularly makes an outgoing call to an endpoint. This outbound request is billed as an execution. The request might cause the trigger to fire or be skipped, which affects whether a workflow instance is created.
Triggers and actions follow Consumption plan rates, which differ based on whether these operations are built-in or managed (Standard or Enterprise). Triggers and actions also make storage transactions, which use the Consumption plan data rate.
Note
As a monthly bonus, the Consumption plan includes several thousand built-in executions free of charge. For more information, see Consumption plan rates.
Prerequisites
- An Azure account and subscription. If you don't have a subscription, sign up for a free Azure account.
- The Azure resource that you want to manage. This article uses an Azure storage account as the example.
- An Office 365 account if you want to follow along with the example, which sends email by using Office 365 Outlook.
Create an automation task
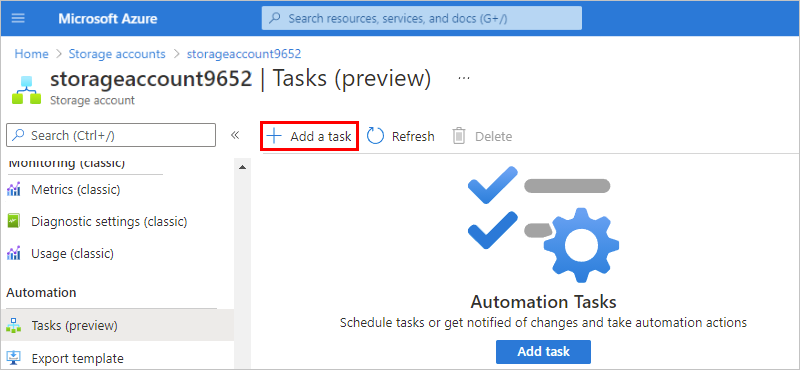
In the Azure portal, find the resource that you want to manage.
On the resource sidebar menu, under Automation, select Tasks.

On the Tasks page toolbar, select Add a task.
On the Add a task page, under Select a template, choose Select* for the task that you want to create. If the next page doesn't appear, select Next: Authenticate.
This example selects the Send monthly cost for resource task template.

Under Authenticate, in the Connections section, select Create for every connection that appears in the task. The types of connections in tasks vary.
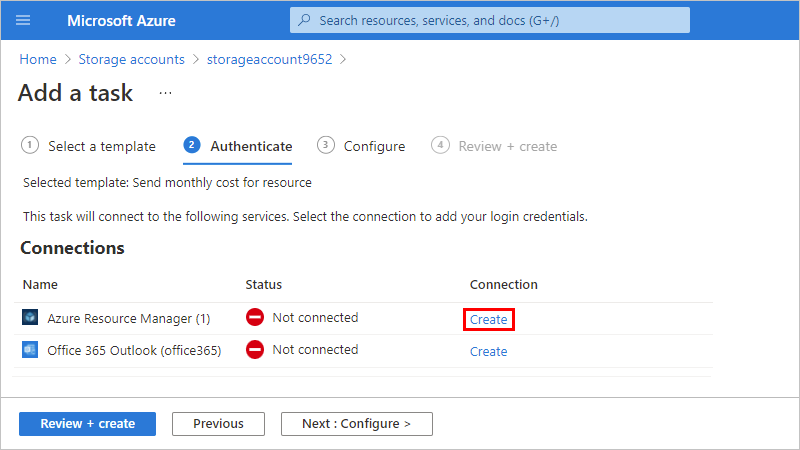
When you're prompted, sign in with your Azure account credentials.
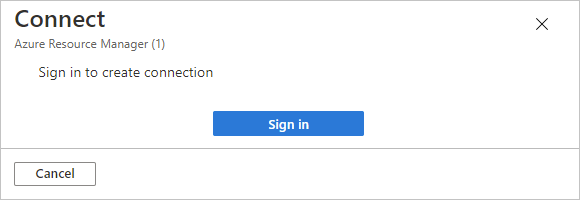
Each successfully authenticated connection looks similar to this example:

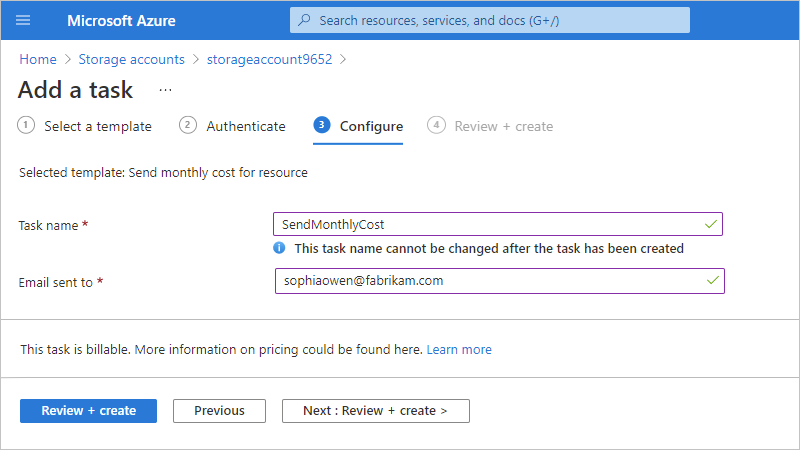
After you authenticate all the connections, select Next: Configure.
Under Configure, provide a name for the task and any other information required for the task. When you're done, select Review + create.
Note
You can't change the task name after creation. If you name your task
SendMonthlyCost, but you later edit the underlying workflow to run weekly, you can't change your task's name toSendWeeklyCost. Consider a name that still applies if you edit the underlying workflow.Changes that you make to the underlying workflow apply only to the task that you create, not the task template.
Tasks that send email notifications require an email address.
The task that you created, which is automatically live and running, now appears on the Tasks list.

Tip
If the task doesn't appear immediately, try refreshing the tasks list or wait a little before you refresh. On the toolbar, select Refresh.
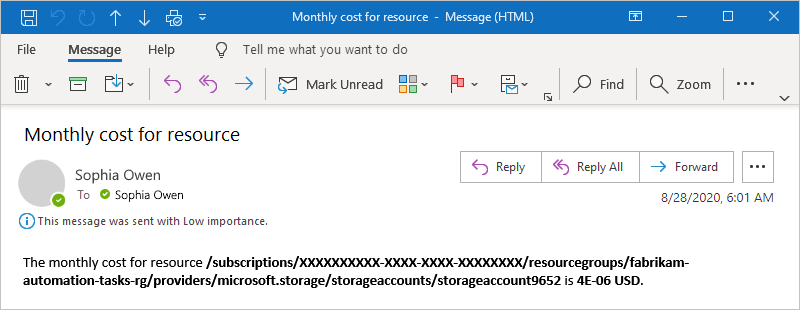
After the selected task runs, you get an email that looks like this example:
Review task history
To view a task's history of runs along with their statuses, inputs, outputs, and other information, follow these steps:
In the Azure portal, find the resource that has the task history that you want to review.
On the resource sidebar menu, under Automation, select Tasks.
In the tasks list, find the task that you want to review. In that task's Runs column, select View.
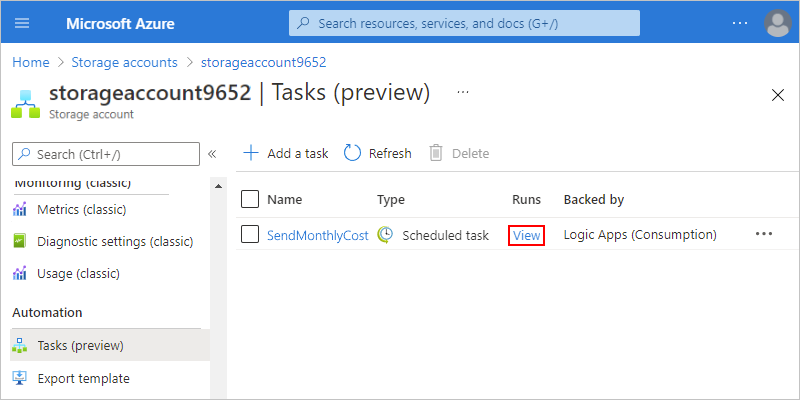
The Runs history pane shows the runs for the task along with their statuses, start times, identifiers, and run durations.

Here the possible statuses for a run:
Status Description Cancelled The task was canceled while running. Failed The task has at least one failed action, but no subsequent actions existed to handle the failure. Running The task is currently running. Succeeded All actions succeeded. A task can still finish successfully if an action failed, but a subsequent action existed to handle the failure. Waiting The run hasn't started yet and is paused because an earlier instance of the task is still running. For more information, see Review workflow run history.
To view the statuses and other information for each step in a run, select that run.
The Logic app run pane opens and shows the underlying workflow that ran.
- A workflow always starts with a trigger. For this task, the workflow starts with the Recurrence trigger.
- Each step shows its status and run duration. Steps that have 0-second durations took less than 1 second to run.

To review the inputs and outputs for each step, select the step, which opens the inputs and outputs pane.
To learn how you can build your own automated workflows so that you can integrate apps, data, services, and systems apart from the context of automation tasks for Azure resources, see Quickstart: Create a Consumption logic app workflow in the Azure portal.
Edit the task
To change a task, you have these options:
- Edit the task inline so that you can change the task's properties, such as connection information or configuration information, for example, your email address.
- Edit the task's underlying workflow in the workflow designer.
Edit the task inline
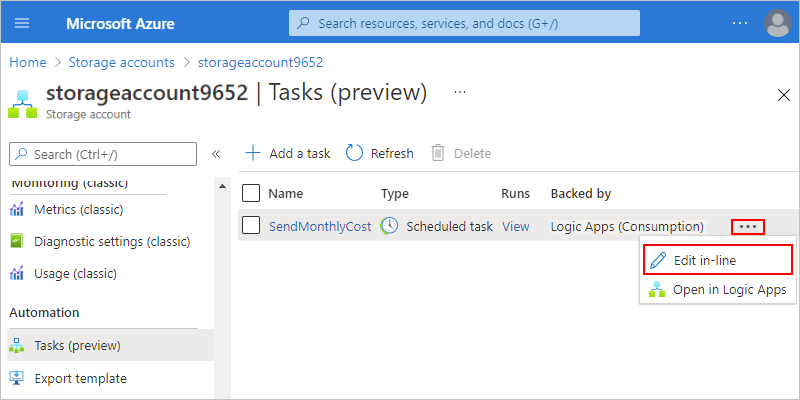
In the Azure portal, find the resource that has the task that you want to update.
On the resource navigation menu, in the Automation section, select Tasks.
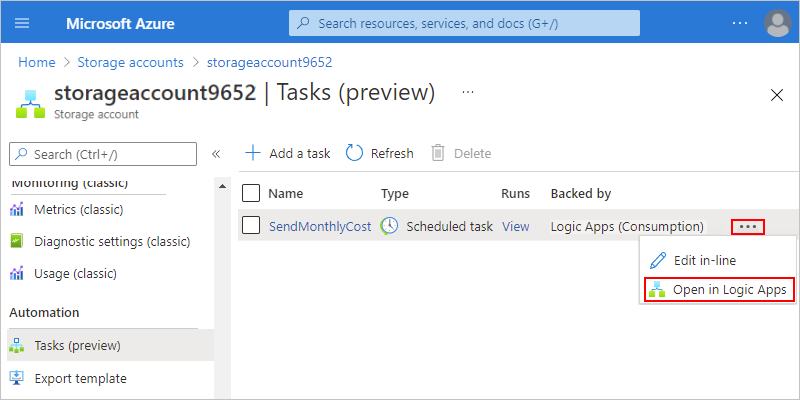
In the tasks list, find the task that you want to update. Open the task's ellipses (...) menu, and select Edit in-line.
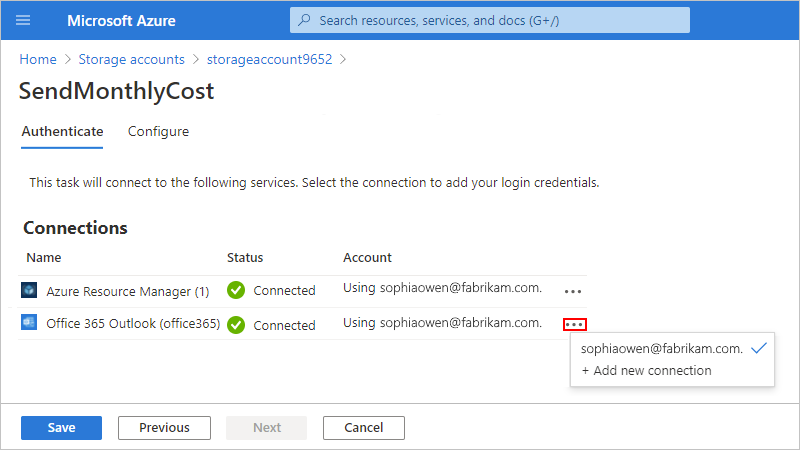
By default, the Authenticate tab appears and shows the existing connections.
To add new authentication credentials or select different existing authentication credentials for a connection, open the connection's ellipses (...) menu, and select either Add new connection or if available, different authentication credentials.
To update other task properties, select Next: Configure.
For the task in this example, the only property available for edit is the email address.

When you're done, select Save.
Edit the task's underlying workflow
When you change the underlying workflow for an automation task, your changes affect only the task instance that you created, and not the template that creates the task. After you make and save your changes, the name that you provided for your original task might not accurately describe the task. You can recreate the task with a different name.
Tip
As a best practice, clone the underlying workflow and edit the copied version. That way, you can make and test your changes on the copy while the original automation task continues to run. You don't risk disruption or breaking existing functionality.
After you finish your changes and are satisfied that the new version runs successfully, you can disable or delete the original automation task. Then use the cloned version for your automation task. The following steps include information about how to clone your workflow.
In the Azure portal, find the resource that has the task that you want to update.
On the resource sidebar menu, under Automation, select Tasks.
In the tasks list, find the task that you want to update. Open the task's ellipses (...) menu, and select Open in Logic Apps.
The task's underlying workflow opens in the designer for Azure Logic Apps.

You can now edit the properties for the workflow. As best practice, follow the steps to clone your workflow. You can make your changes on a copy while the original workflow continues to run.
To clone your workflow and edit the copied version instead, follow these steps:
In the Azure portal search box, find and select Logic apps, and then select your logic app resource.
On the resource sidebar menu, select Overview.
On the Overview toolbar, select Clone.
On the Create a logic app pane, under Logic app name, enter a new name for your copied logic app resource and workflow.
Except for Logic App Status, you can't edit the other properties.
Under Logic App Status, select Disabled. The cloned workflow doesn't run while you make your changes. You can enable the workflow when you're ready to test your changes.
After Azure finishes provisioning your cloned workflow, find and open that workflow in the designer.
To view the properties for the trigger or an action, select that trigger or action on the designer:
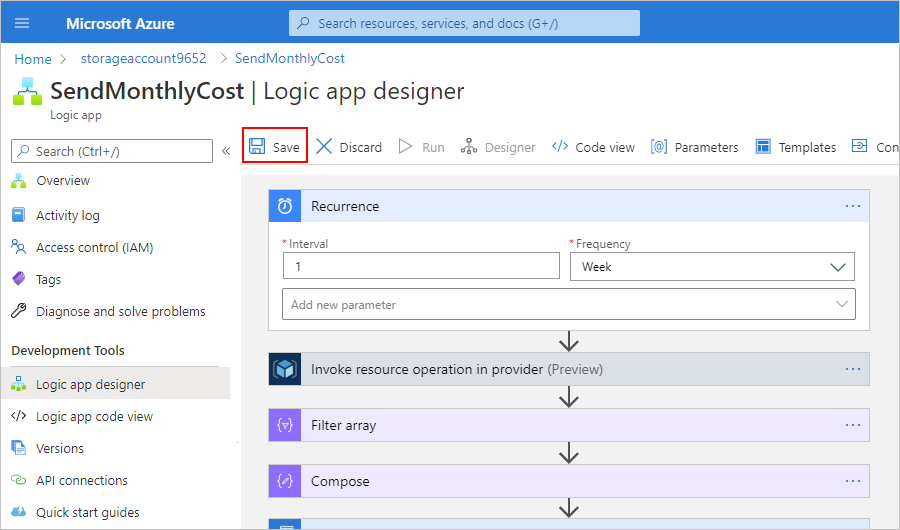
For example, you can change the Recurrence trigger to run weekly, rather than monthly.
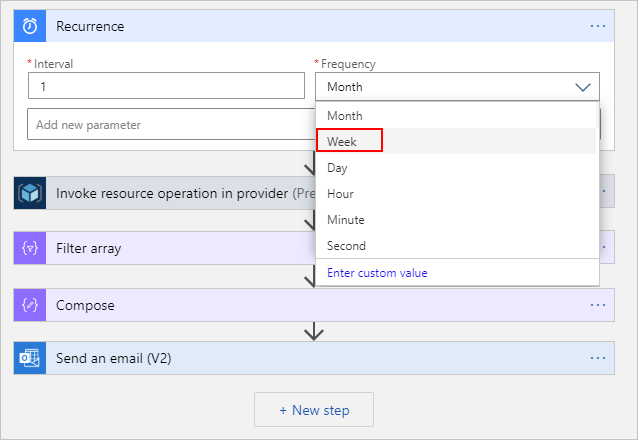
For more information about the Recurrence trigger, see Create, schedule, and run recurring tasks and workflows with the Recurrence trigger..
To save your changes, on the designer toolbar, select Save.
To test and run the updated workflow, on the designer toolbar, select Run > Run.
To disable the workflow so that the task doesn't continue running, see Manage logic apps in the Azure portal.
Create automation task template from workflow
You can create your own automation task template by using any Consumption logic app workflow that starts with a recurring or event-based trigger, but not HTTP-based triggers or HTTP-based webhook triggers. For this task, you need the following items:
A GitHub account.
Your forked version of the automation task templates GitHub repository.
For more information about forks and creating a fork, see the following GitHub documentation:
A working branch in your forked repository where you add your automation task template.
For more information about branches and creating a branch, see the following documentation:
Your choice of a web debugging tool. This example uses Fiddler 4, but you can try the free trial available for Fiddler Everywhere.
To create the template and make the template available for use in Azure, here are the high-level steps:
- Export the workflow to an automation task template.
- Upload your template to your working branch in your forked repository.
- Test your template by using your web debugging tool, such as Fiddler.
- Create a pull request (PR) for your working branch against the default branch in the automation task templates GitHub repository.
After the Azure Logic Apps team reviews and approves your PR for merging to the default branch, your template is live and available to all Azure customers.
Export workflow to automation task template
Before you begin, make sure that the workflow starts with a recurring or event-based trigger, instead of an HTTP-based trigger or HTTP-based webhook trigger.
In the Azure portal, open the Consumption logic app resource that has the workflow you want to export.
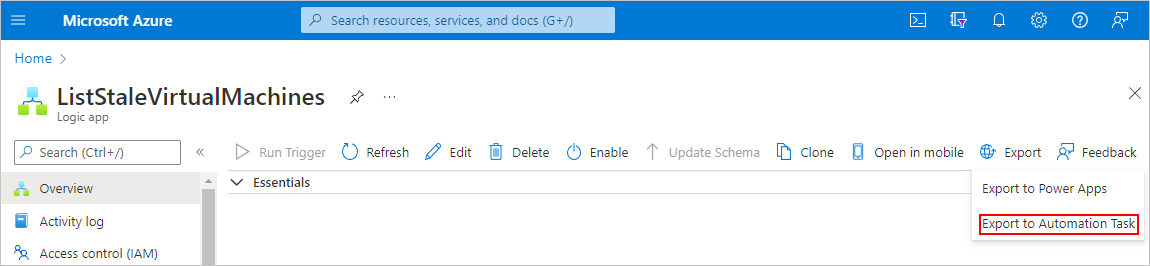
On the resource sidebar menu, select Overview.
On the Overview toolbar, select Export > Export to Automation Task.
On the Export to Automation Task pane that opens, provide the following information:
Property Required Value Description Template Name Yes <template-name> The friendly display name for the automation task template.
Important: Make sure that you use a concise and easy-to-understand name, for example, List stale virtual machines.Template Description Yes <template-description> A description for the template's task or purpose Supported Resource Types No Empty or <supported-Azure-resource-type-list> The first-class Azure resource types where you want to make the template available. Subresource types are currently unsupported. To include all first-class Azure resource types, leave this property empty. To specify multiple resource types, separate each name with a comma and use the following syntax:
Microsoft.<service-provider>/<entity>
For example, to make the template available for Azure resource groups, specify Microsoft.Resources/resourceGroups. For more information, review Resource providers for Azure services.Unsupported Resource Types No Empty or <unsupported-Azure-resource-type-list> If any, the Azure resource types where you specifically don't want to make the template available. To specify multiple resource types, separate each name with a comma and use the following syntax:
Microsoft.<service-provider>/<entity>
For example, to make the template unavailable for Azure resource groups, specify Microsoft.Resources/resourceGroups. For more information, review Resource providers for Azure services.Configure Parameters No Varies If your workflow includes cross-environment parameter definitions, those parameters appear in this section for you to configure further. You can select whether each parameter value is provided either from the resource or the task creator.
- If you select From Resource, select a Source Parameter property value to use from that resource:
-- Resource Name
-- Resource Type
-- Resource Id
-- Subscription Id
-- Resource Group
-- Resource Location.
- If you select User Provided, select a Template format that determines how the task creator provides the parameter value:
-- Default: The parameter value is anything other than an interval, frequency, or time zone.
---- Specify the parameter's display name, default value, and description.
---- If the value is a timestamp (hh:mm:ss), set the Format property to Time Format.
---- To mark the parameter as required, change the Optional to Required.
-- Interval: The parameter value is an interval, such as 1 or 12.
-- Frequency: The parameter value is a frequency, such as Hour, Day, or Month.
-- Timezone: The parameter value is a time zone, such as (UTC-08:00) Pacific Time (US & Canada).The following example shows the properties for a sample automation task template:

In this example, the task's underlying workflow includes the following parameter definitions and specifies that these parameter values are provided by the task creator.
When you're done, select Download Template, and save the template using the .json file name extension. For a consistent template name, use only lowercase, hyphens between words, and the following syntax:
<action-verb>-<Azure-resource>For example, based on the earlier example template name, you might name the template file
power-off-virtual-machine.json.
Upload template to GitHub
Go to GitHub, and sign in with your GitHub account.
Go to the automation task templates GitHub repository, which takes you to the default branch in the repository.
From the branch list, switch to your working branch.
Above the files list, select Add file > Upload files.
Either drag your workflow definition file to the specified area on the page, or select choose your files.
After you add your template, in the same folder, open the manifest.json file, and add an entry for your JSON file.
Test your template
You can use your favorite web debugging tool to test the template you uploaded to your working directory. This example continues by using Fiddler with the script that modifies web requests. If you use a different tool, use the equivalent steps and script for your tool.
In the Fiddler script, find the
onBeforeRequest()function, and add the following code to the function, for example:static function OnBeforeRequest(oSession: Session) { if (oSession.url == "raw.githubusercontent.com/azure/automation-task-template/master/templates/manifest.json") { oSession.url = "raw.githubusercontent.com/<GitHub-username>/automation-task-template/<working-branch>/templates/manifest.json"; } if (oSession.url == "raw.githubusercontent.com/azure/automation-task-template/master/templates/<template-name>") { oSession.url = "raw.githubusercontent.com/<GitHub-username>/automation-task-template/<working-branch>/templates/<template-name>"; } {...} }This code gets the manifest.json and <template-name>.json files from your forked repository, rather than from the main Azure GitHub repository.
So, based on the example, the file redirection code looks like the following version:
static function OnBeforeRequest(oSession: Session)
{
   if (oSession.url == "raw.githubusercontent.com/azure/automation-task-template/master/templates/manifest.json") {
      oSession.url = "raw.githubusercontent.com/sophowe/automation-task-template/upload-auto-template/templates/manifest.json";
   }

   if (oSession.url == "raw.githubusercontent.com/azure/automation-task-template/master/templates/list-stale-virtual-machines.json") {
      oSession.url = "raw.githubusercontent.com/sophowe/automation-task-template/upload-auto-template/templates/list-stale-virtual-machines.json";
   }

   {...}
}
Before you run your test, make sure to close all browser windows, and clear your browser cache in Fiddler.
Open a new browser window, and sign in to the Azure portal.
Open the Azure resource where you expect to find your automation task. Create an automation task with your exported template. Run the task.
If your task runs successfully, continue by creating a pull request from your working branch to the default branch.
Create your pull request
Under Commit changes, enter a concise but descriptive title for your update. You can provide more information in the description box.
Select Create a new branch for this commit and start a pull request. At the prompt, provide a name for your working branch, for example:
<your-GitHub-alias>-<automation-task-name>-templateWhen you're ready, select Propose changes. On the next page, select Create pull request.
Provide a name and description for your pull request. In the lower-right corner, select Create pull request.
Wait for the Azure Logic Apps team to review your pull request.
Provide feedback
We'd like to hear from you! To report bugs, provide feedback, or ask questions about this preview capability, contact the Azure Logic Apps team.